
How to install HandicapMaster Network Edition on the SQL Server Computer
Pre-requisites
Please check that your hardware and software meet the
requirements to run SQL Server 2014 SP3 Express.
Note that SQL Server 2014 SP3 Setup requires Microsoft Windows Installer 4.5 or a later version. You MUST have this installed this before proceeding. Note this may
require a reboot of the server computer. You can find the version of windows installer on your computer as follows:
- Click Windows START button
- Select RUN...
- In the OPEN box, please type 'msiexec' and click OK
- On the window displayed the version of Windows installer will be displayed. Click OK to remove the window
- If the version is less than 4.5 then please download and install Microsoft Windows Installer 4.5
The installation of SQL Server 2014 SP3 Express will require administrator access.
It is also good data processing practice to take backups of your data prior to performing this installation.
If you require further detailed information about SQL Server 2014 SP3 Express this is available from
Microsoft.
Otherwise please follow the instructions below to install SQL Server and HandicapMaster on the Server Computer.
Download and Install HandicapMaster
- Download the HandicapMaster Network Server Installer.
- Run the installer to install HandicapMaster.
This will install HandicapMaster and SQL Server 2014 SP3 Express (64-bit). It will then run a Configuration utility
to install a HandicapMaster database into SQL Server.
HandicapMaster SQL Server 2014 Installation
This installer will install SQL Server 2014 SP3 Express Edition, as follows:
- An SQL Server instance called HANDICAPMASTER will be installed.
- The password for the SA account for this instance will be 'GolfClub123'. We strongly recommend this is changed after finishing installation.
This installer will install SQL Server 2014 SP3 Express Edition, as follows:
- An SQL Server instance called HANDICAPMASTER will be installed.
- The password for the SA account for this instance will be 'GolfClub123'. We strongly recommend this is changed after finishing installation.
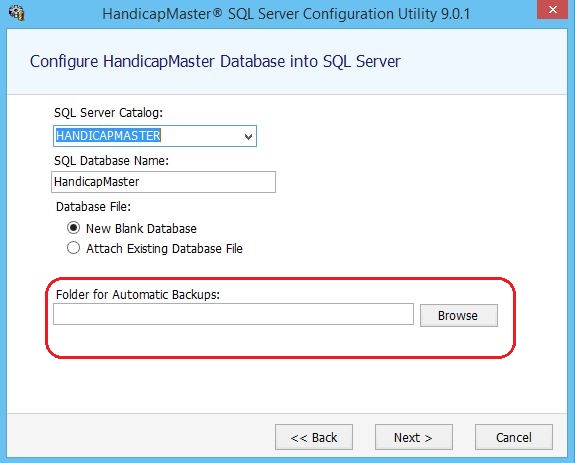
When the 'HandicapMaster SQL Server Configuration Utility' runs, select a suitable folder for HandicapMaster to maintain backups:
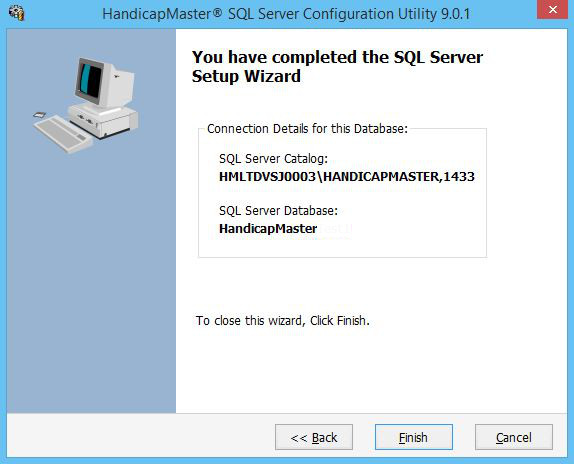
When the configuration utility completes, make a note of the connection details. You will need these when you run HandicapMaster:
Configure SQL Server to allow access from other Computers on the Network
The default installation of SQL Server does not enable Network access so you will need to enable this
using the 'SQL Server Configuration Manager' which is installed as part of the 'SQL Server 2014 Express' installation.
- Start the SQL Server Configuration Manager. From the 'Start' bar select All Programs --> 'Microsoft SQL Server 2014 SP3' --> 'Configuration Tools' --> 'SQL Server Configuration Manager'.
- Double click on 'SQL Server Network Configuration', then click 'Protocols for HANDICAPMASTER'. Check TCP/IP protocol is Enabled.
- Configure TCP/IP Port
Now configure a port for the SQL server to listen for network requests. By default SQL server uses port 1433, however for security reasons you may wish to use an alternative port.
If you are unsure of a suitable value please discuss this with your network administrator.
Double click the TCP/IP protocol entry, then click 'IP Addresses' Tab
In the 'IPAll' section at the bottom of the list, delete any value for 'TCP Dynamic Ports' (do not leave this value as 0 (the default) it MUST be 'blank' to turn off Dynamic Ports).
Enter a port value of 1433 in 'TCP Port' and click OK to save these changes.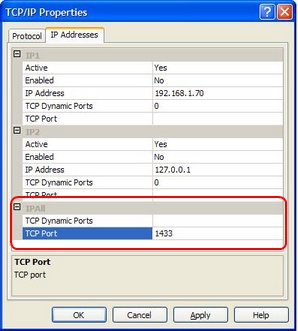
- Restart SQL Server Services
- In the left hand column, click and highlight 'SQL Server Services'.
- On the right hand side click and highlight 'SQL Server (HANDICAPMASTER)', then
right-click and select 'Restart'.
Please note it can take a short time for SQL Server to stop and restart.
Run HandicapMaster
Start up HandicapMaster either by double clicking on the desktop icon or from the 'Start' bar
select All Programs -> HandicapMaster9 -> 'HandicapMaster 9'.
You will be presented with the Setup Interview Wizard.
- Click 'Next' Select Network Edition and click 'Next'.
- Complete the wizard, choosing the applicable settings.
Firewall configuration
If you are running a firewall you may need to configure it to allow the SQL server to receive
incoming requests. The following information should be provided to your firewall administrator.
The program '\Program Files\Microsoft SQL Server\MSSQL.12.HANDICAPMASTER\MSSQL\BINN\sqlservr.exe'
needs to be enabled in the firewall to allow incoming TCP requests on port 1433 (the default)
or the port configured in the step above.